Getting Started With Whyis
We can use a lot of Whyis’s capabilities without writing any code. This guide will show how to install whyis as a python package, create a starter knowledge graph, load knowledge into the graph, including transforming some data into RDF, and then show how to explore the knowledge with different Whyis tools.
For this guide, we will be re-creating the Les Miserables knowledge graph.
Note: We will be using Unix system commands that will work in Linux, Mac OS, and in the Windows Linux Subsystem.
Install Whyis
Follow the instructions for installation.
Create a Knowledge Graph App (KGApp)
To create a knowledge graph application, create a new directory somewhere and enter it:
mkdir les_mis_demo
cd les_mis_demo
Then run the whyis command. You will see initialization for Fuseki and Celery:
Loading embedded config
Starting Fuseki on port 61365
Knowledge Endpoint: http://localhost:61365/knowledge
Admin Endpoint: http://localhost:61365/admin
debugtoolbar extension not available.
Starting redis...
Adding app to <whyis.autonomic.autonomic_setlr.SETLr object at 0x13be53eb0>
Adding app to <whyis.autonomic.setl_maker.SETLMaker object at 0x13be53c10>
Adding app to <whyis.autonomic.sdd_agent.SDDAgent object at 0x13be53850>
Starting embeddded Celery
 * Serving Flask app "Whyis" (lazy loading)
 * Environment: development
 * Debug mode: on
 * Running on http://127.0.0.1:5000/ (Press CTRL+C to quit)
Loading embedded config
Loading local embedded config
debugtoolbar extension not available.
Adding app to <whyis.autonomic.autonomic_setlr.SETLr object at 0x132c56c70>
Adding app to <whyis.autonomic.setl_maker.SETLMaker object at 0x132c56ca0>
Adding app to <whyis.autonomic.sdd_agent.SDDAgent object at 0x132c56d60>

 -------------- celery@Jamies-MBP.hsd1.ct.comcast.net v5.1.2 (sun-harmonics)
--- ***** -----
-- ******* ---- macOS-12.5.1-x86_64-i386-64bit 2023-02-06 23:30:04
- *** --- * ---
- ** ---------- [config]
- ** ---------- .> app:         Whyis:0x132db8dc0
- ** ---------- .> transport:   redis+socket:///var/folders/f6/ycns0j1s7b18hsn_9_mqst4r0000gn/T/tmpb6ad46kx/redis.socket
- ** ---------- .> results:     socket:///var/folders/f6/ycns0j1s7b18hsn_9_mqst4r0000gn/T/tmpb6ad46kx/redis.socket
- *** --- * --- .> concurrency: 16 (prefork)
-- ******* ---- .> task events: OFF (enable -E to monitor tasks in this worker)
--- ***** -----
 -------------- [queues]
                .> celery           exchange=celery(direct) key=celery


[tasks]
  . whyis.app.process_nanopub
  . whyis.app.process_resource
  . whyis.app.run_importer
  . whyis.app.update
You can then visit the main page at http://localhost:5000. Click on “Register”:
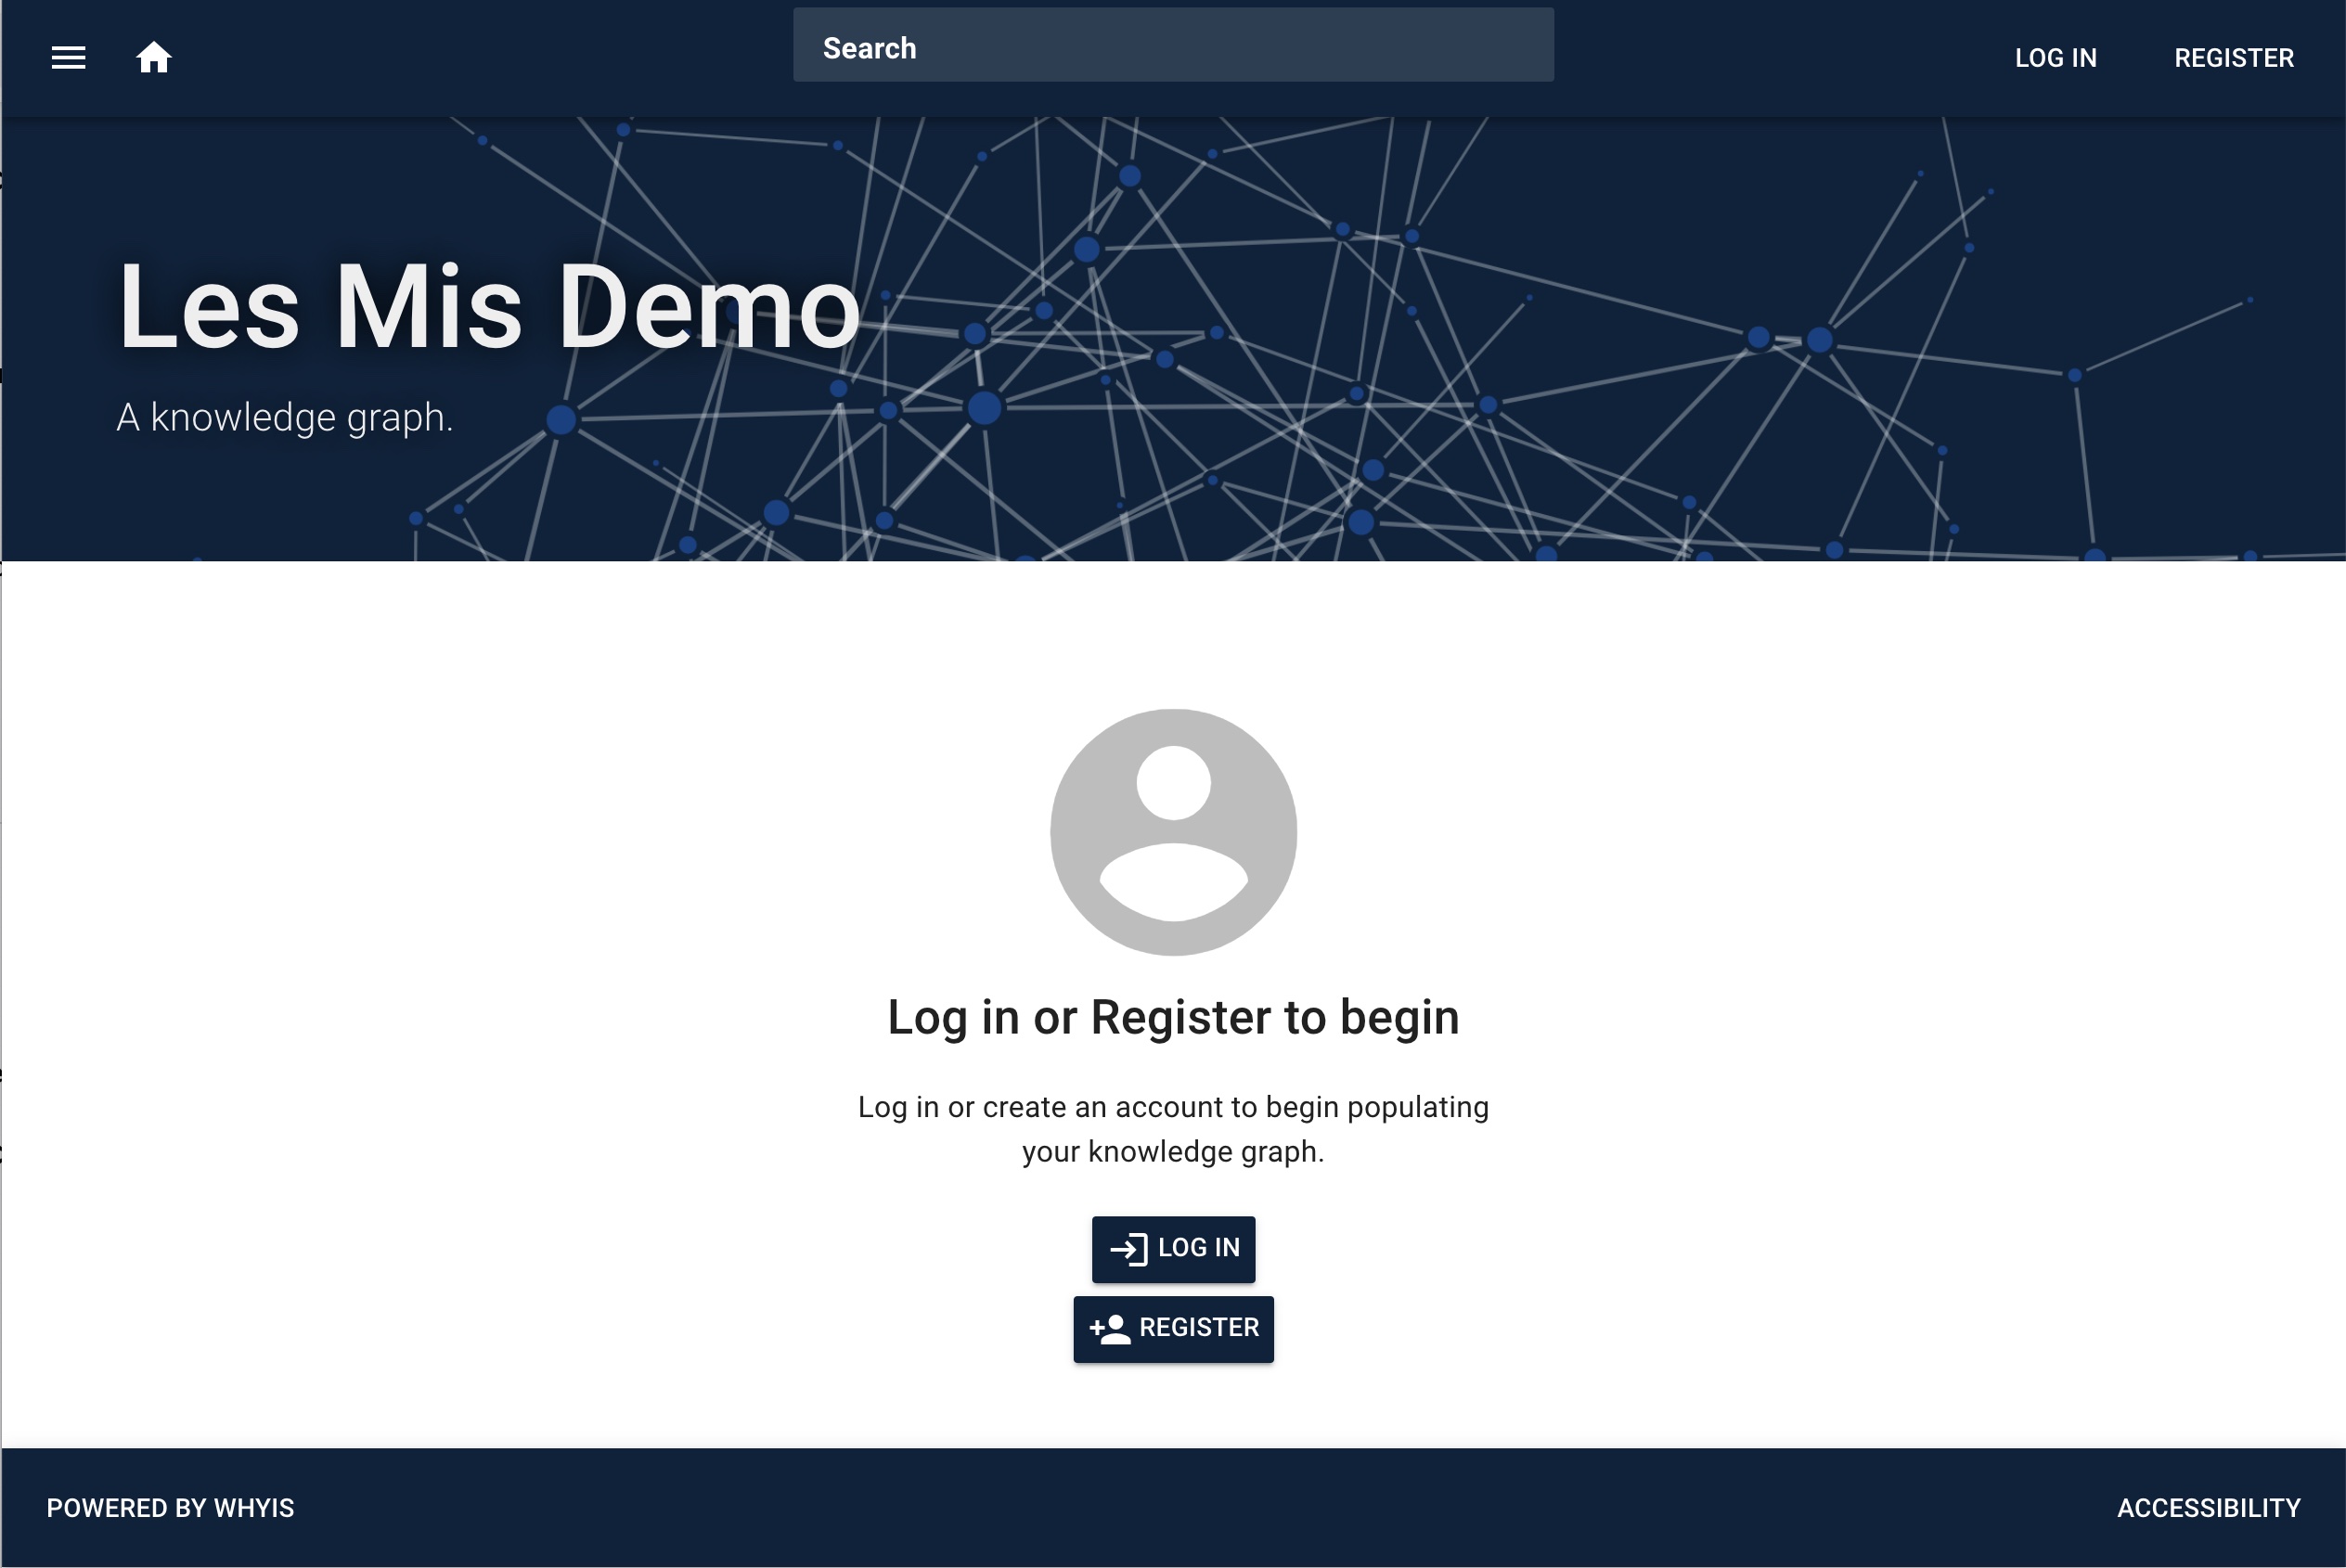
Select a handle (user ID), email address, password, and first and last name. You will be logged in from there and can now add knowlege from the main page.
Adding Knowledge
Knowledge can be added in the form of RDF documents using either the web
interface or a whyis command on the command line.
Load Knowledge From the Web Browser
RDF can be loaded from the menu on the upper left of most pages, or if there is no knowledge in the graph yet, from the link in the center of the default page:
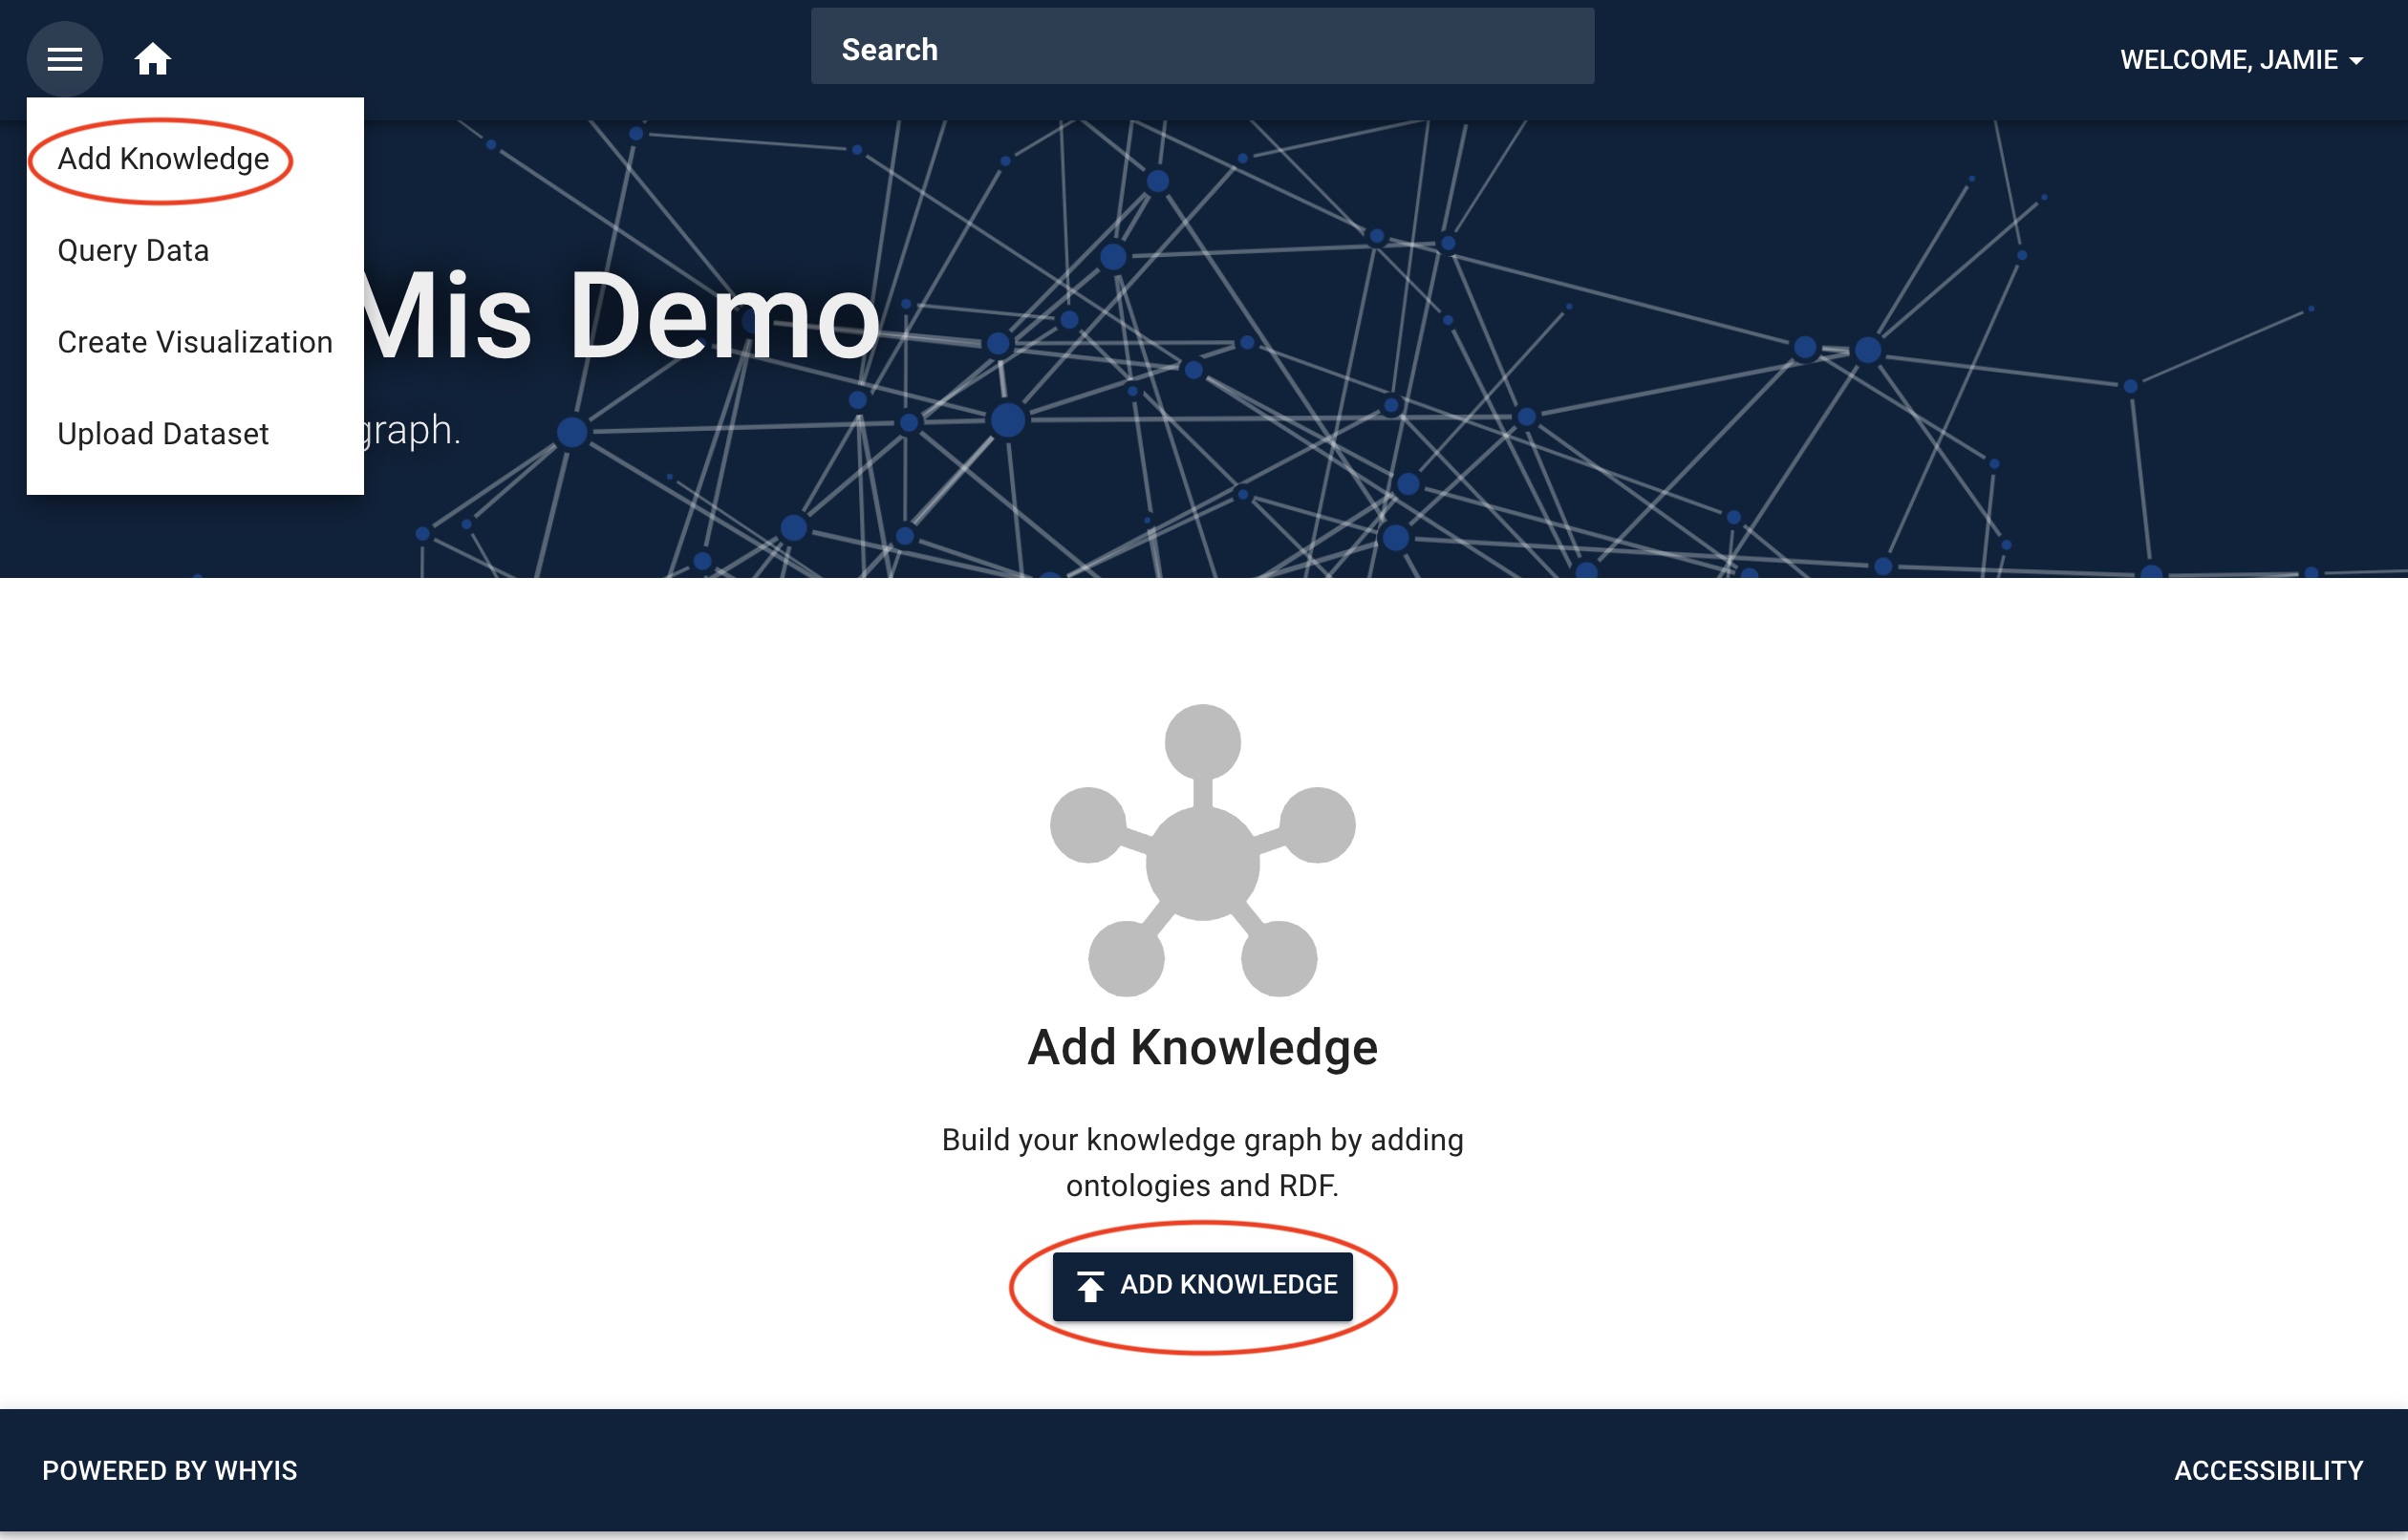
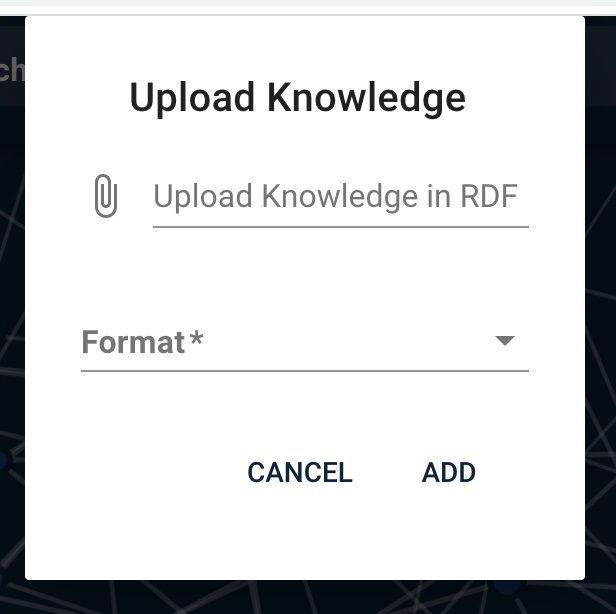
Both links will open a dialog for uploading knowledge. Select an RDF file (top) and its format (bottom) and submit to add the RDF.
Load Knowledge From the Command Line
RDF can also be loaded using the whyis load command. It can accept local files or remote URLs. We will use this to load a base vocabulary that includes types and labels for the most often used classes and properties in OWL, RDFS, SKOS, Dublin Core Terms, and DCAT.
whyis load -f trig -i https://raw.githubusercontent.com/tetherless-world/whyis/main/base.trig
You should see output similar to the following:
Loading embedded config
Loading local embedded config
debugtoolbar extension not available.
Adding app to <whyis.autonomic.autonomic_setlr.SETLr object at 0x1395979d0>
Adding app to <whyis.autonomic.setl_maker.SETLMaker object at 0x139597a00>
Adding app to <whyis.autonomic.sdd_agent.SDDAgent object at 0x139597ac0>
wrapped graph https://purl.org/whyis/base_vocabulary with http://purl.org/whyis/local/pub/NjgwMDAyLjc3NTk0OTM5Mzk
Prepared http://purl.org/whyis/local/pub/NjgwMDAyLjc3NTk0OTM5Mzk
Adding to agent queue: http://purl.org/whyis/local/pub/NjgwMDAyLjc3NTk0OTM5Mzk
Published http://purl.org/whyis/local/pub/NjgwMDAyLjc3NTk0OTM5Mzk
False
Note that the named graph https://purl.org/whyis/base_vocabulary was used as
an assertion in the new nanopublication
http://purl.org/whyis/local/pub/NjgwMDAyLjc3NTk0OTM5Mzk. That nanpublication
tracks when and how the named graph was added, but keeps the original URI for it
in place.
Load and Transform Data
We will use a Semantic Data Dictionary (SDD) to describe the network data available through the Les Miserables Character Network.
The RDF file will identify a data file each for the nodes (characters) and edges (interactions) of the graph, along with an SDD for each. The data file is linked to its SDD using dcterms:conformsTo, and has some additional annotations for URI prefixes and the delimiter to be used to process the file.
Once loaded, the SDD agent will recognize the SDD and compile SETL scripts for each one. Those scripts will in turn be processed by the SETLr agent to create the actual RDF.
The command to start the process is:
whyis load -f turtle -i https://raw.githubusercontent.com/whyiskg/les-mis-demo/main/data/les-miserables.ttl
The output is similar to the previous RDF load, but since there is no named graph in the file, the entire file is turned into a single nanopublication:
Loading embedded config
Loading local embedded config
debugtoolbar extension not available.
Adding app to <whyis.autonomic.autonomic_setlr.SETLr object at 0x13a0e1c10>
Adding app to <whyis.autonomic.setl_maker.SETLMaker object at 0x13a0e1c40>
Adding app to <whyis.autonomic.sdd_agent.SDDAgent object at 0x13a0e1c70>
Prepared http://purl.org/whyis/local/pub/MTIzMDI3LjgyNjEyMTE2Mzg1
Adding to agent queue: http://purl.org/whyis/local/pub/MTIzMDI3LjgyNjEyMTE2Mzg1
Published http://purl.org/whyis/local/pub/MTIzMDI3LjgyNjEyMTE2Mzg1
False
At this point, the inference agent system will process the data into RDF to be included in the knowledge graph.
It’s important to note that while this example loads everything that is needed to process the data file at once, it is possible and common for this to be added progressively. The agents will only be triggered when all the requirements are met, even if they are met through multiple additions to the knowledge graph.
Customizing Views
One important aspect of Whyis is that there are a number of
web and data views available for each entity. Views provide a way to
simplify access to knowledge graph resources through a web browser, but also through
data APIs that those web pages use. For instance, the default view uses “incoming
links” and “outgoing links” views for entities that make some basic assumptions.
We can refine how those links are generated by customizing those views. We start
by editing the vocab.ttl file to add custom view templates for
schema.org/Person. Add the following to the bottom
of the vocab.ttl file in your KGApp:
@prefix schema: <http://schema.org/>.

schema:Person a owl:Class;
  whyis:hasOutgoing "outgoing_person.json";
  whyis:hasIncoming "incoming_person.json";
.
This will tell Whyis that for Person instances and their subclasses, look at the outgoing_person.json template file for the outgoing view (registered as a
view name in the whyis vocab file), and to look at the incoming_person.json
template file for the incoming view. We will need to make those files in the
templates/ directory in your KGApp:
templates/outgoing_person.json
{% raw %}
{{'''graph ?assertion {
      {
         ?article sio:hasParticipant ?source.
         ?article sio:hasParticipant ?target.
         ?article a ?link_type.
      }
    }
    bind(?article as ?link)
    bind(0.8 as ?probability)
    filter (!sameTerm(?source, ?target) && isIRI(?target))
''' | probit(source=this.identifier) | tojson }}
{% endraw %}
templates/incoming_person.json
{% raw %}
{{'''graph ?assertion {
      {
         ?article sio:hasParticipant ?target.
         ?article sio:hasParticipant ?source.
         ?article a ?link_type.
      }
    }
    bind(?article as ?link)
    bind(0.8 as ?probability)
    filter (!sameTerm(?source, ?target) && isIRI(?source))
''' | probit(target=this.identifier) | tojson }}
{% endraw %}
These templates pass a SPARQL query fragment to the probit filter, which queries for links in the expected format. The important thing to note is that the target an source values are bound to the two participants in the interaction.
Explore the Knowledge Graph
Once the knowledge is added to the graph, the main page will display the most commonly instantiated types. For our graph, they are Person, Chapter, Interaction, Time Interval, Property, and Class.

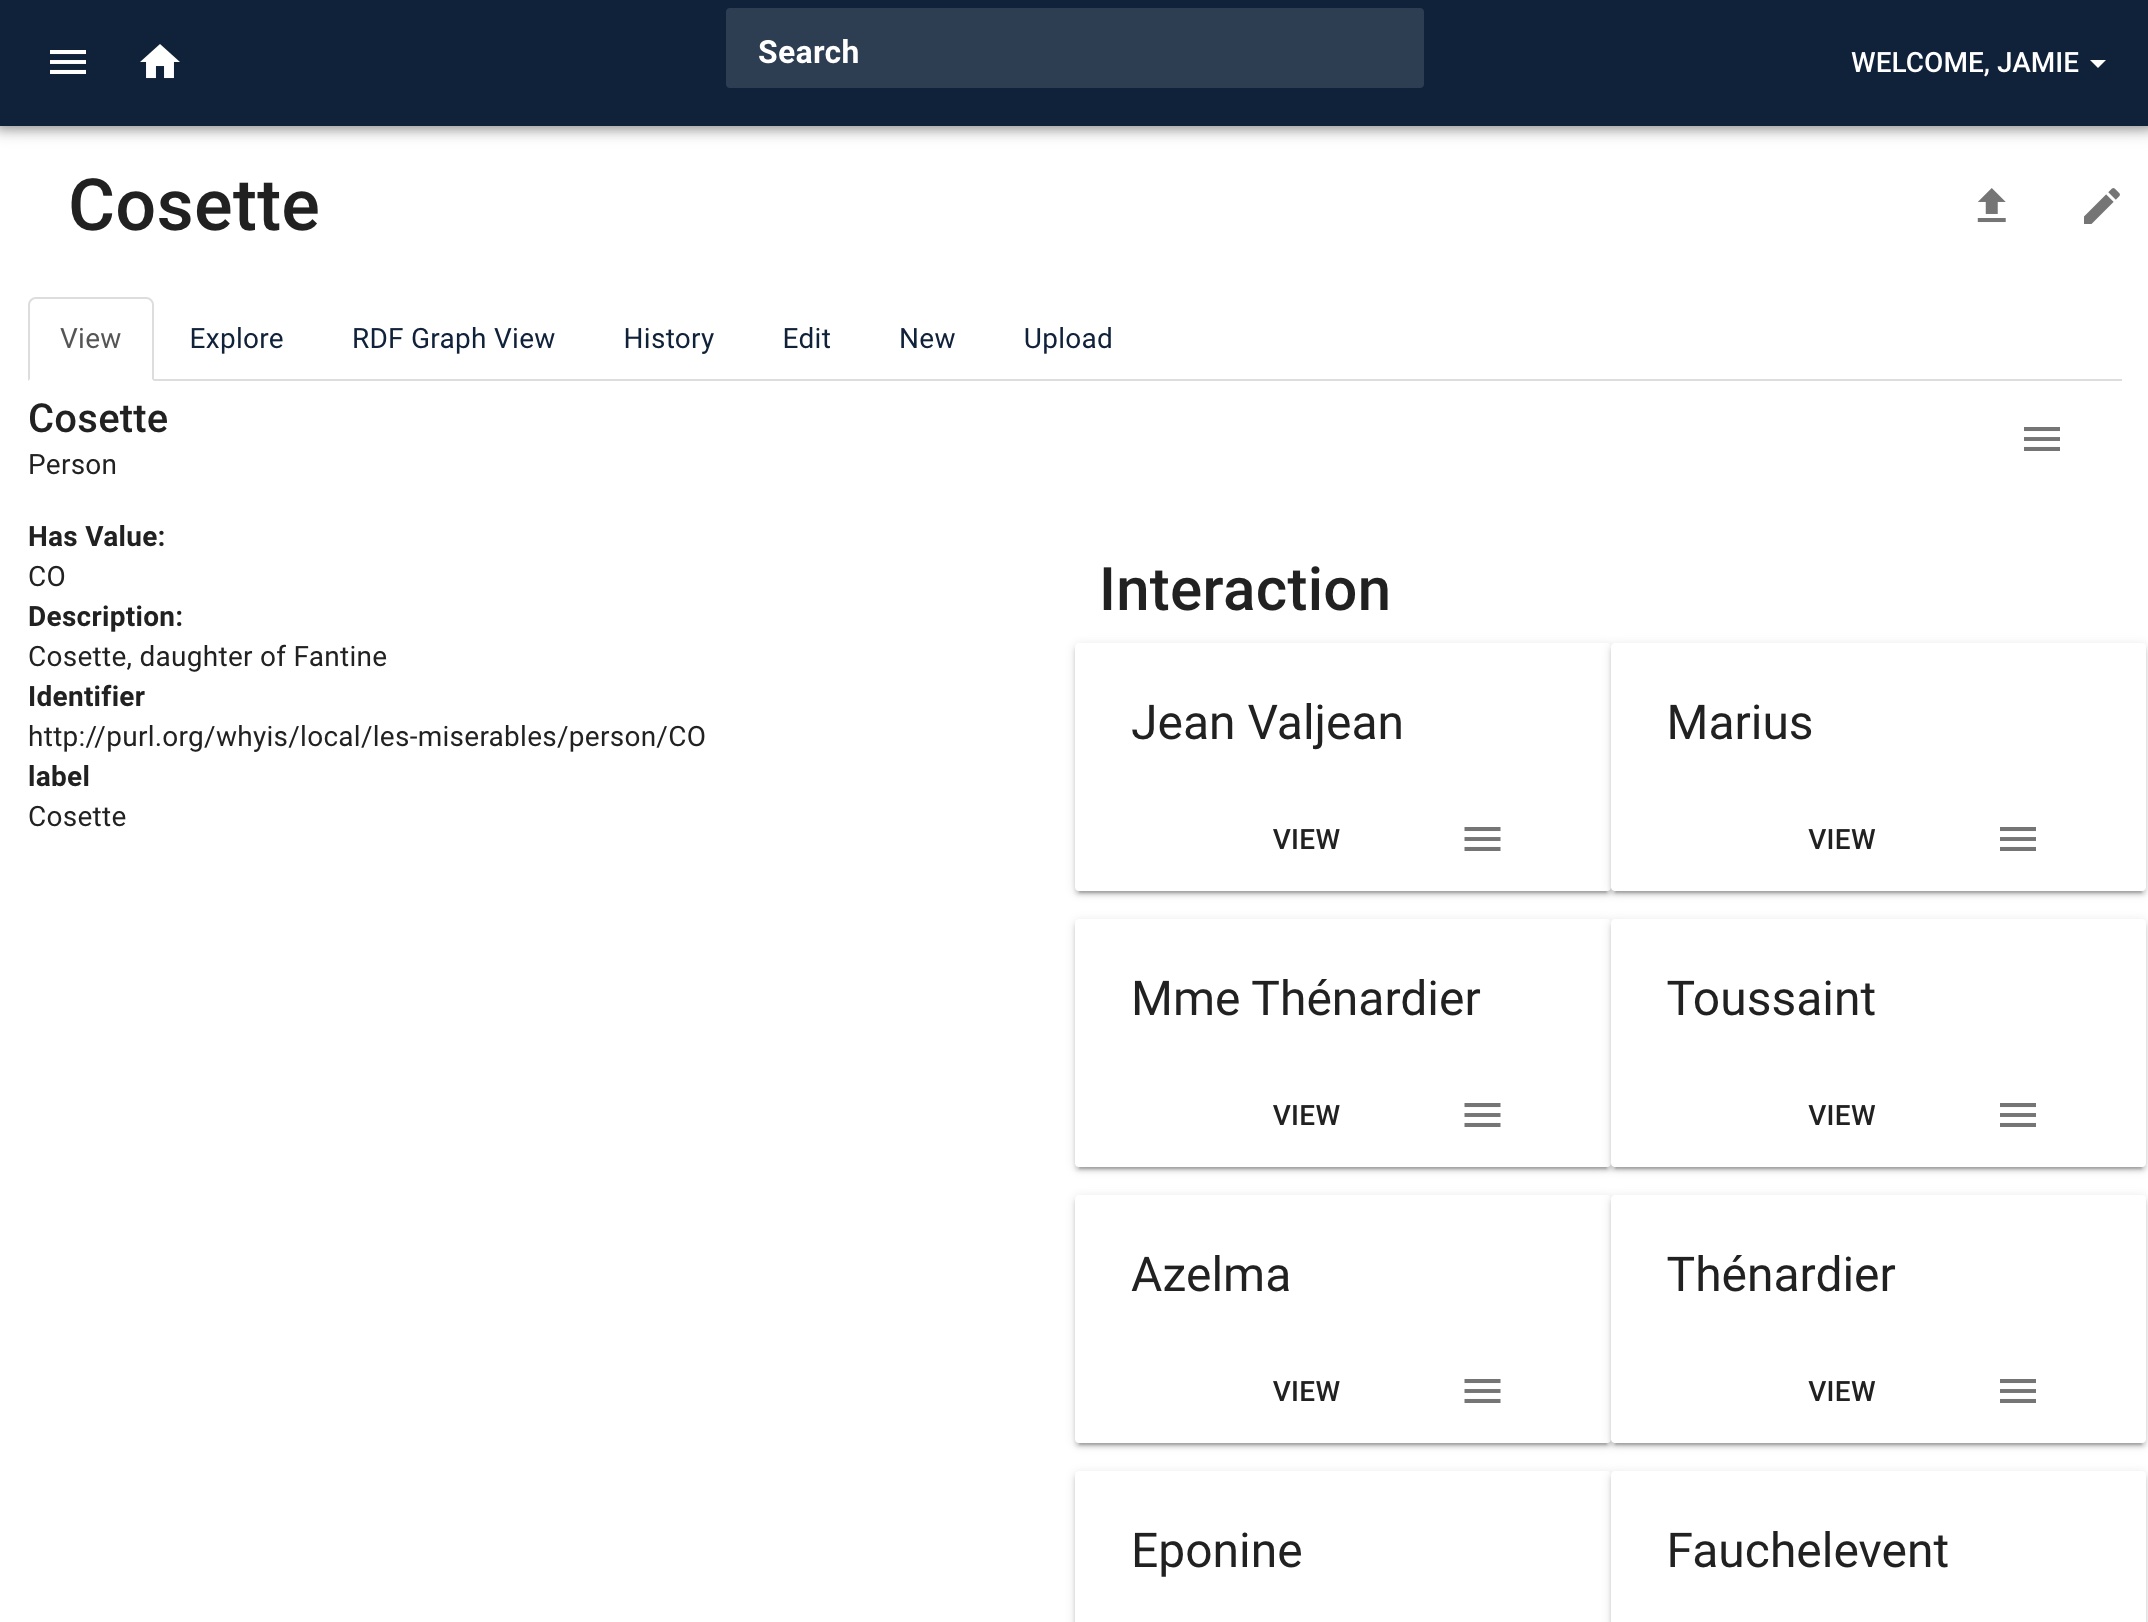
If we click on “Person” we will see the page for schema.org/Person, including an album of characters from the book.
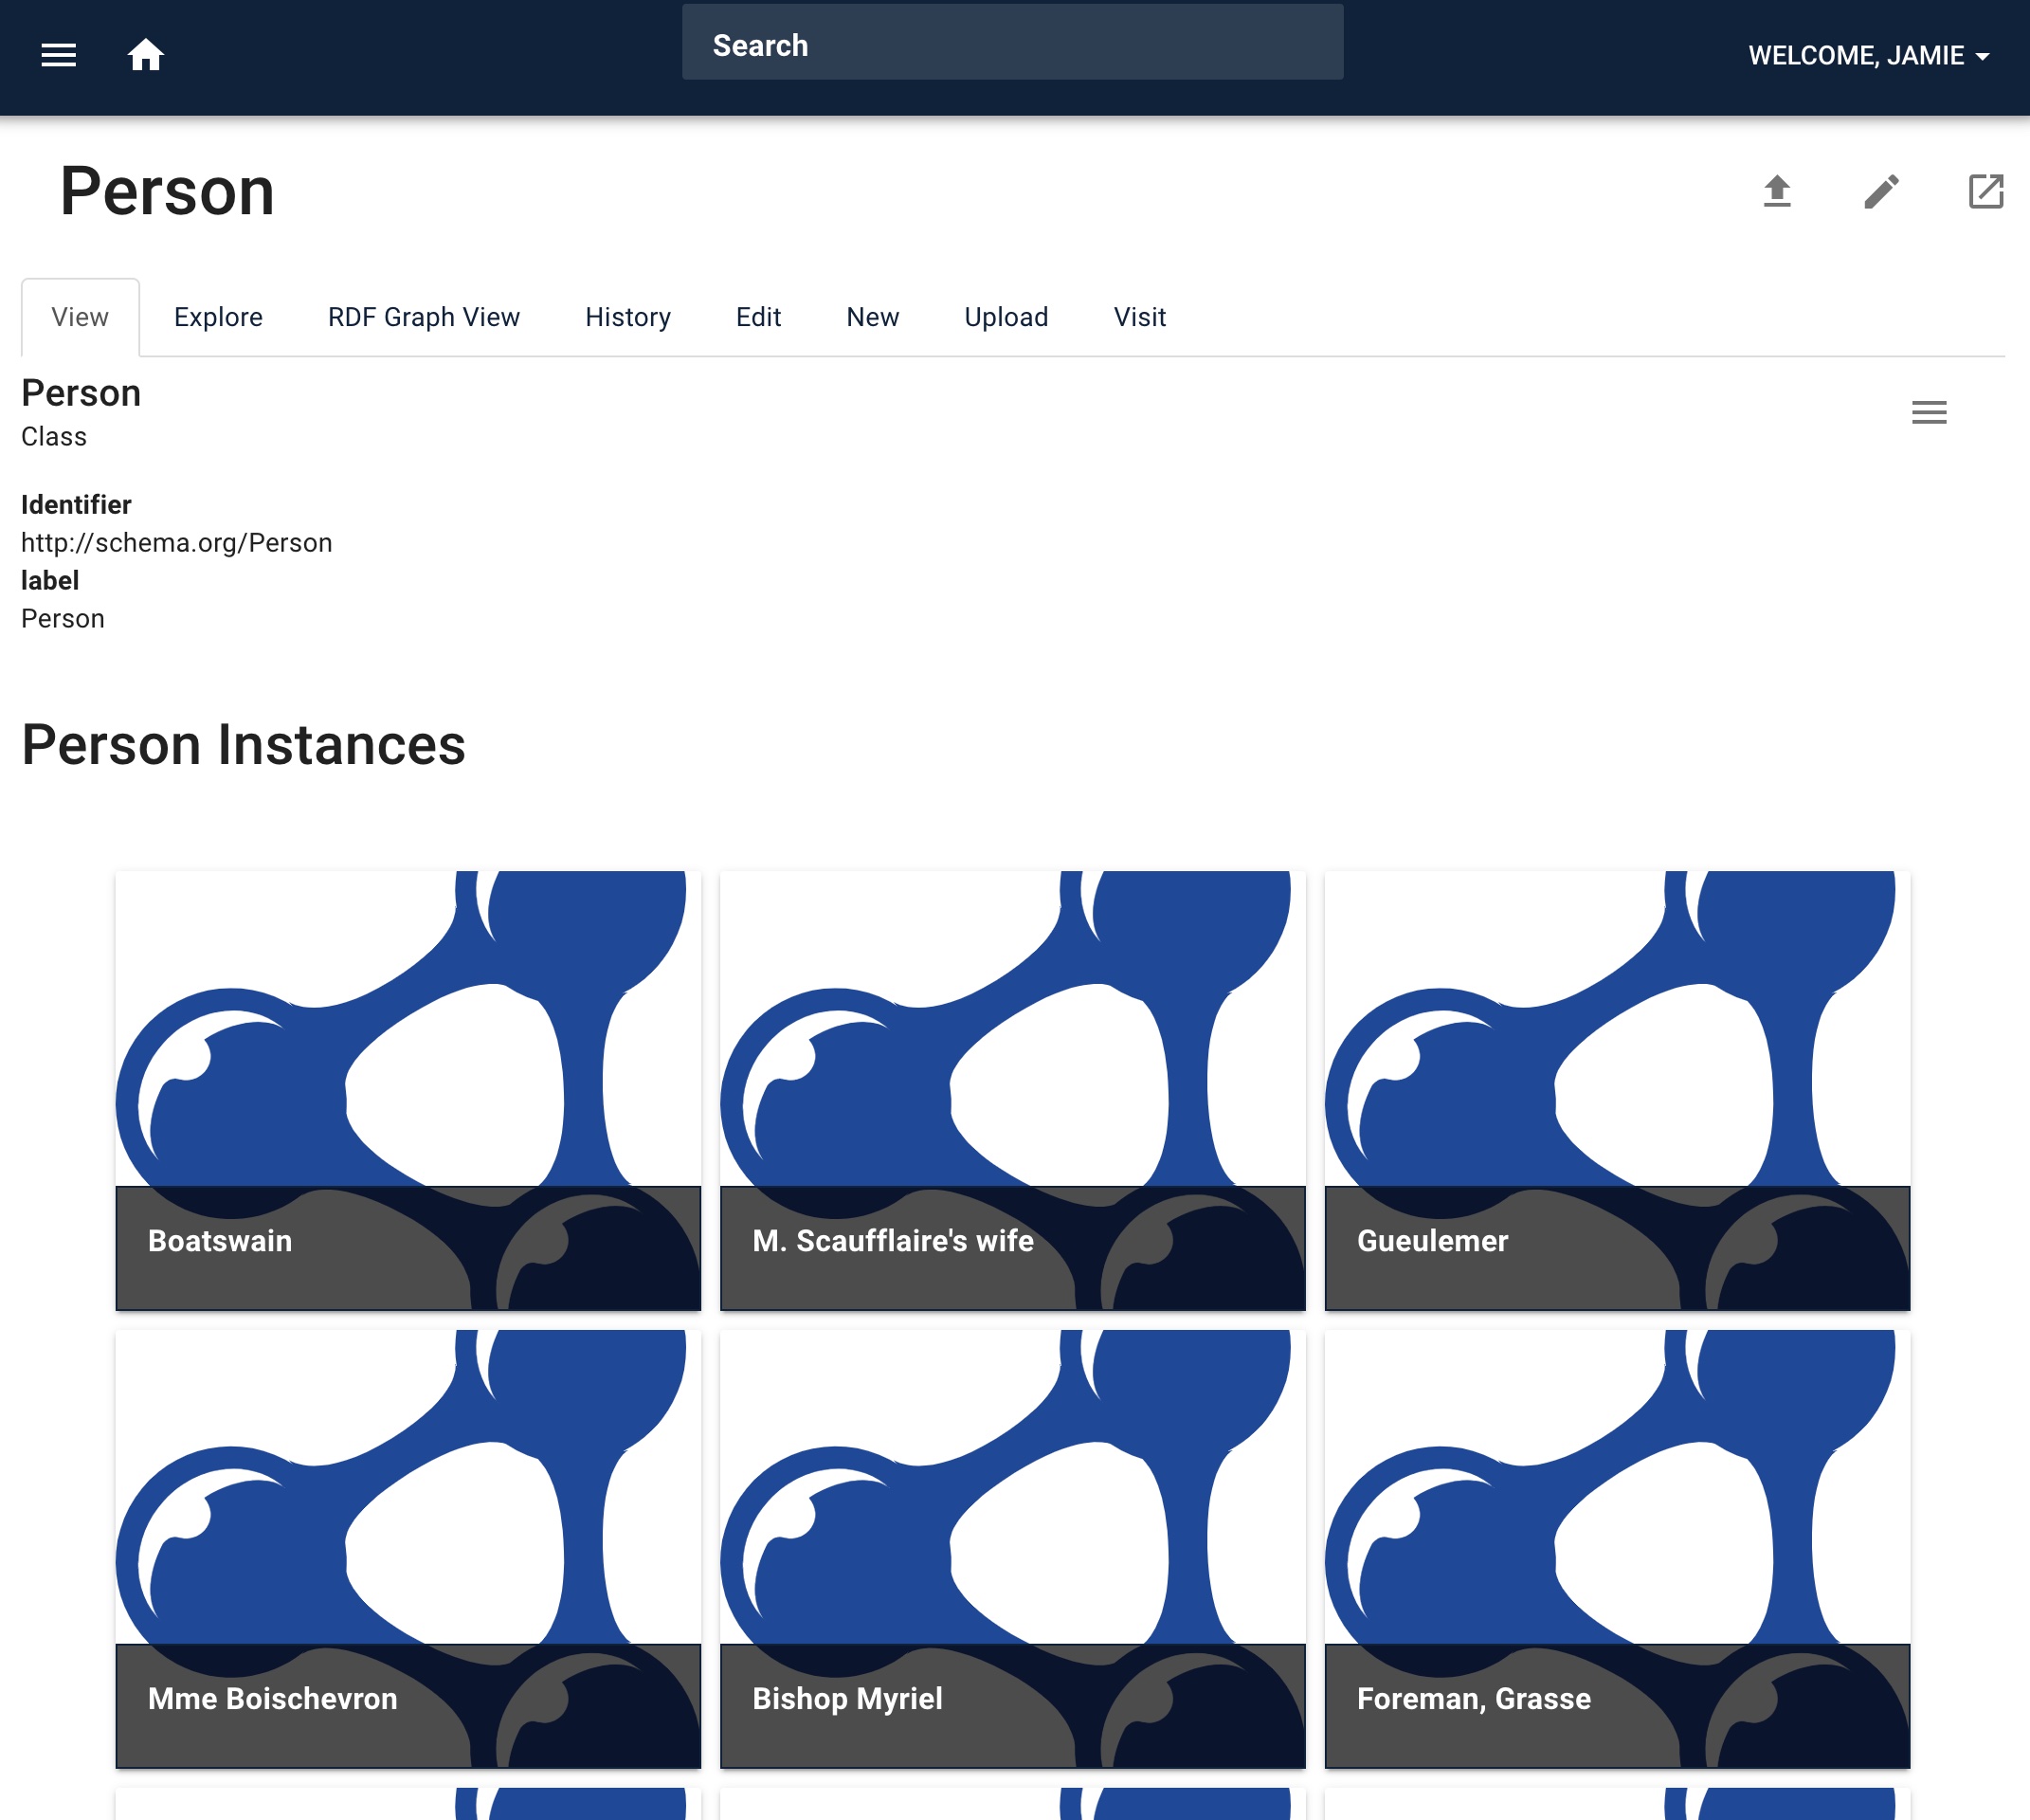
Click on any of the characters to view more information about them:
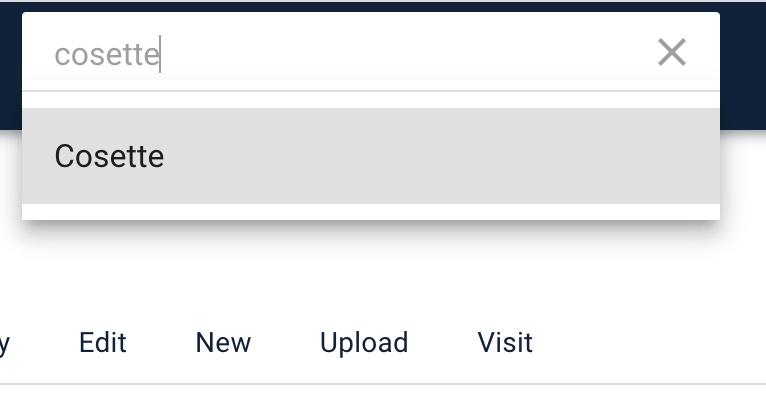
Search and Browse the Knowledge Graph
We can also use full text search to find specific entities in the graph. Type a name or some text into the search box at the top of most pages and it will auto-complete on any names or labels in the graph.
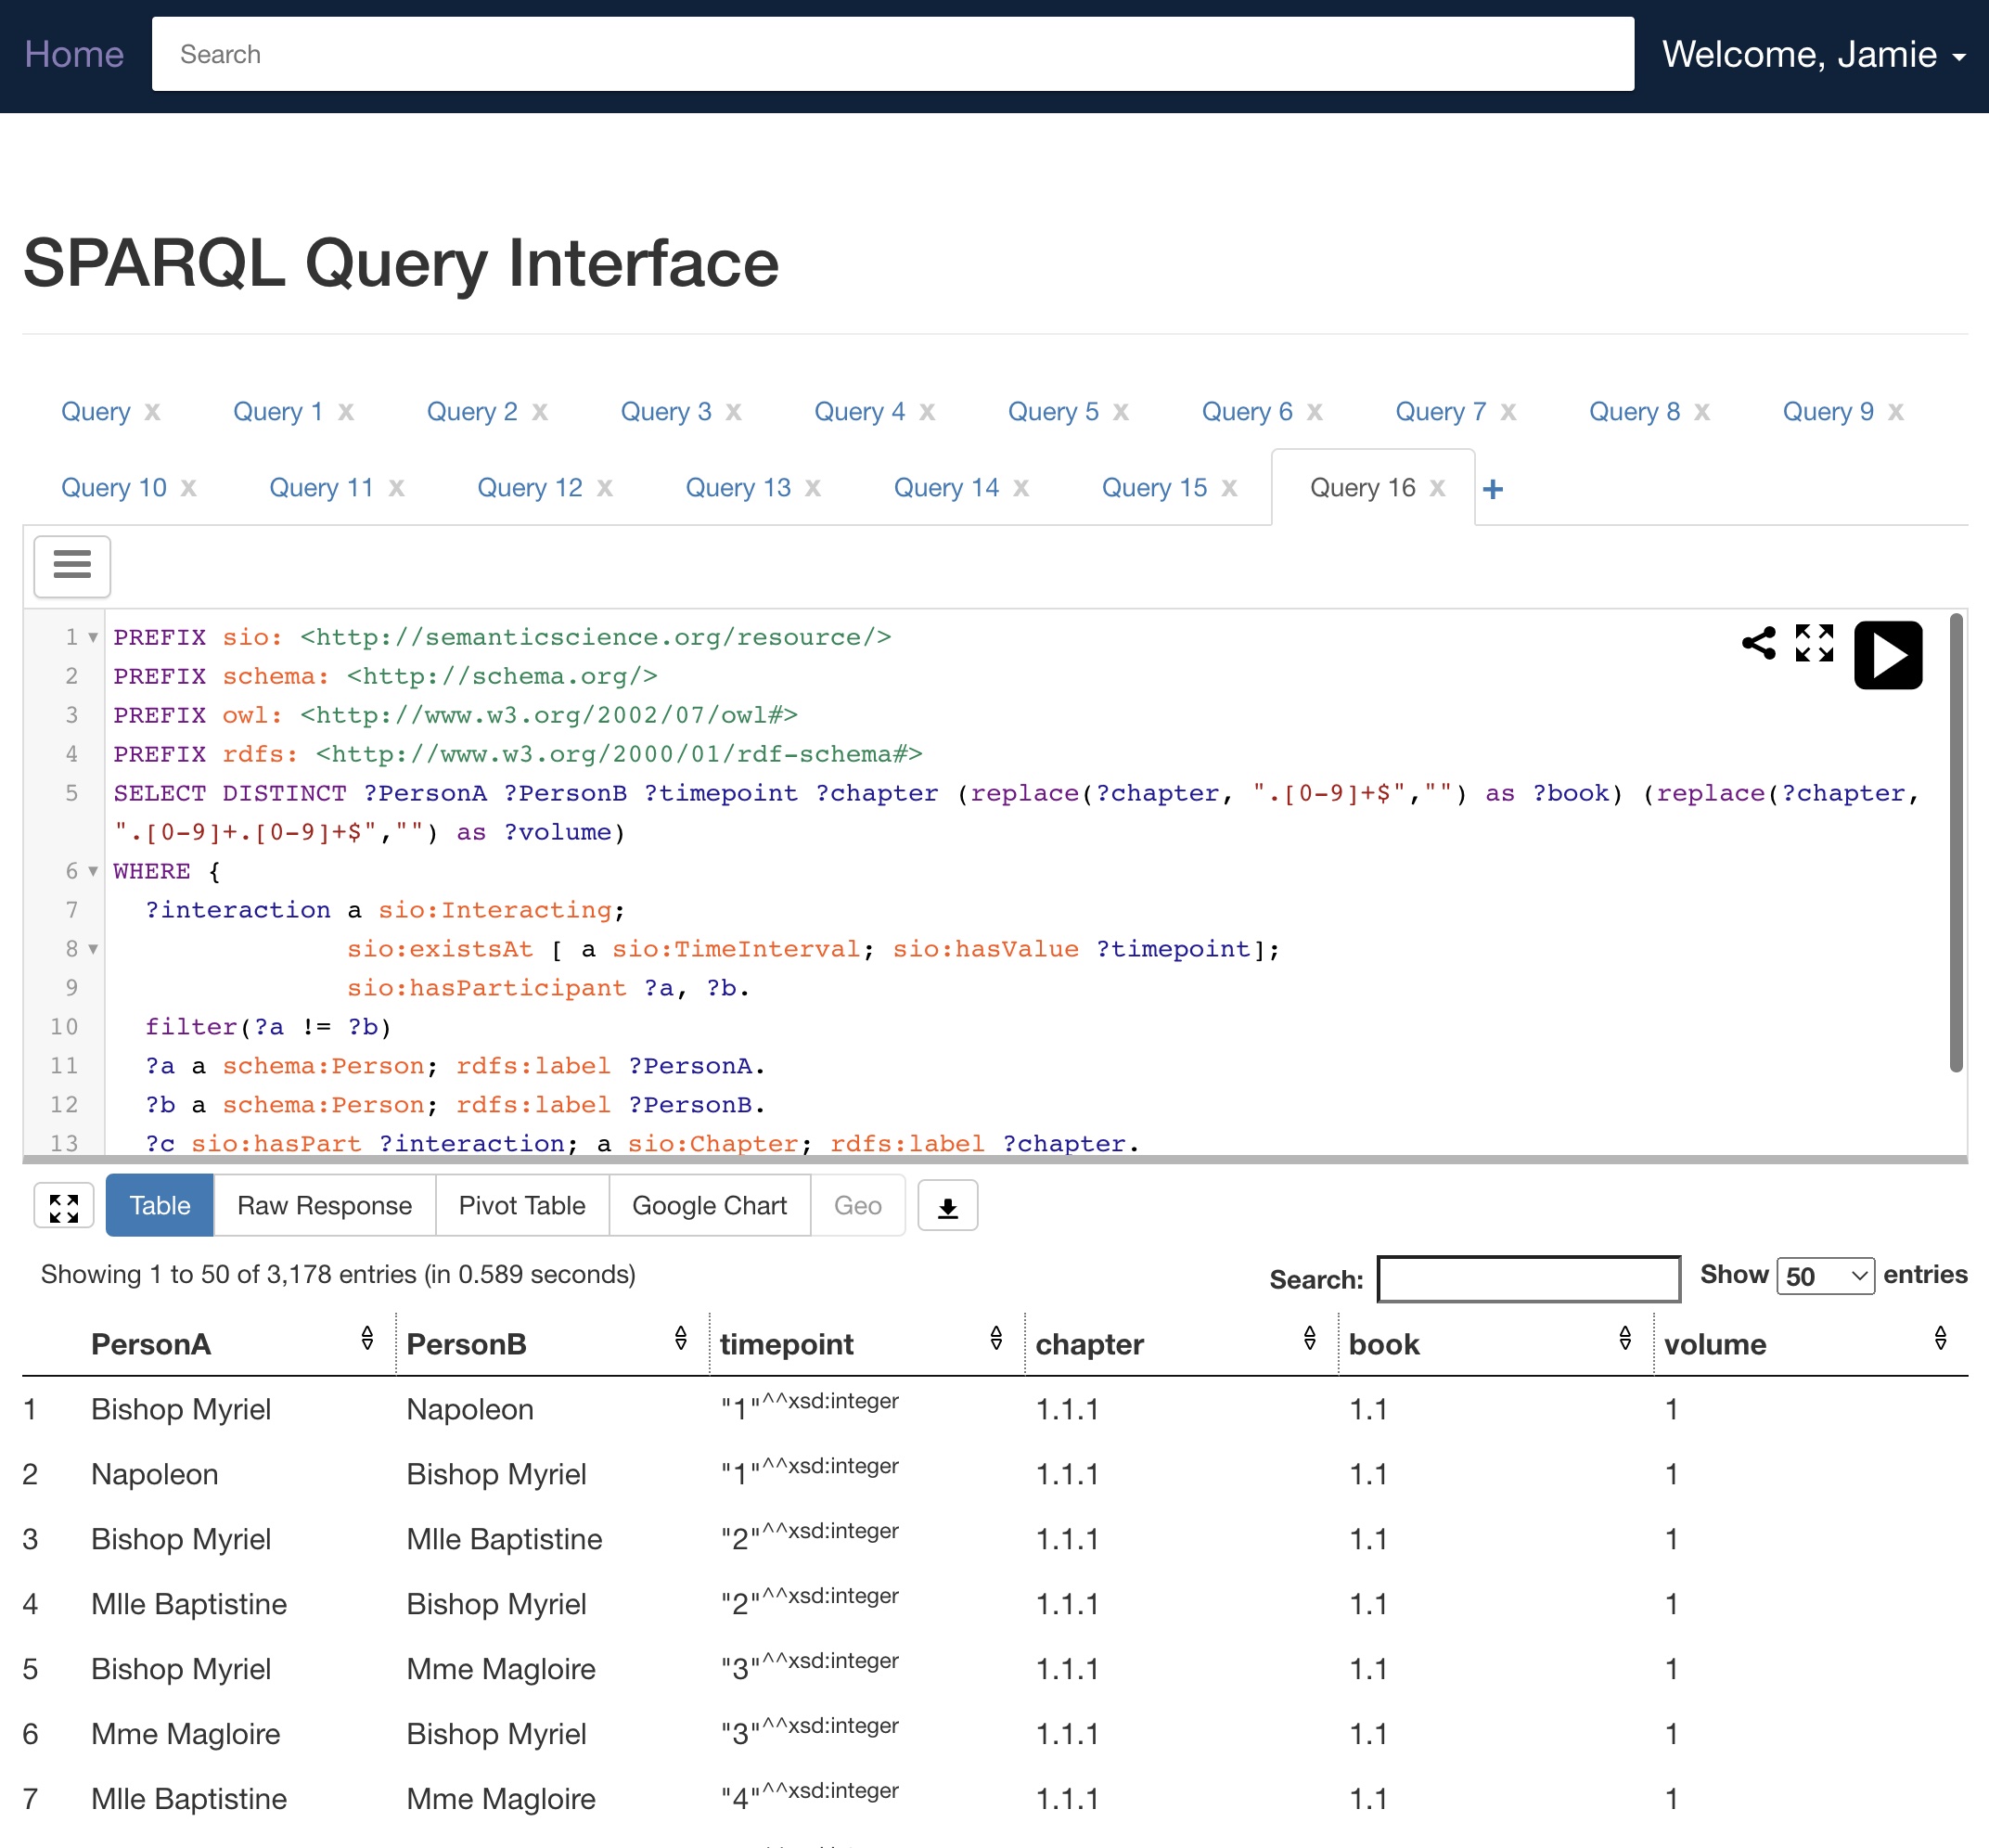
Query with SPARQL
Whyis uses the YASGUI SPARQL UI for editing and running queries in the web browser.
The endpoint URL is always /sparql, and visiting that (available from the top left menu)
will load the web query interface. Use the following query to get a set of interactions between characters grouped by chapter, book, and volume:
PREFIX sio: <http://semanticscience.org/resource/>
PREFIX schema: <http://schema.org/>
PREFIX owl: <http://www.w3.org/2002/07/owl#>
PREFIX rdfs: <http://www.w3.org/2000/01/rdf-schema#>
SELECT DISTINCT ?PersonA ?PersonB ?timepoint ?chapter (replace(?chapter, ".[0-9]+$","") as ?book) (replace(?chapter, ".[0-9]+.[0-9]+$","") as ?volume)
WHERE {
  ?interaction a sio:Interacting;
               sio:existsAt [ a sio:TimeInterval; sio:hasValue ?timepoint];
               sio:hasParticipant ?a, ?b.
  filter(?a != ?b)
  ?a a schema:Person; rdfs:label ?PersonA.
  ?b a schema:Person; rdfs:label ?PersonB.
  ?c sio:hasPart ?interaction; a sio:Chapter; rdfs:label ?chapter.

} order by ?timepoint
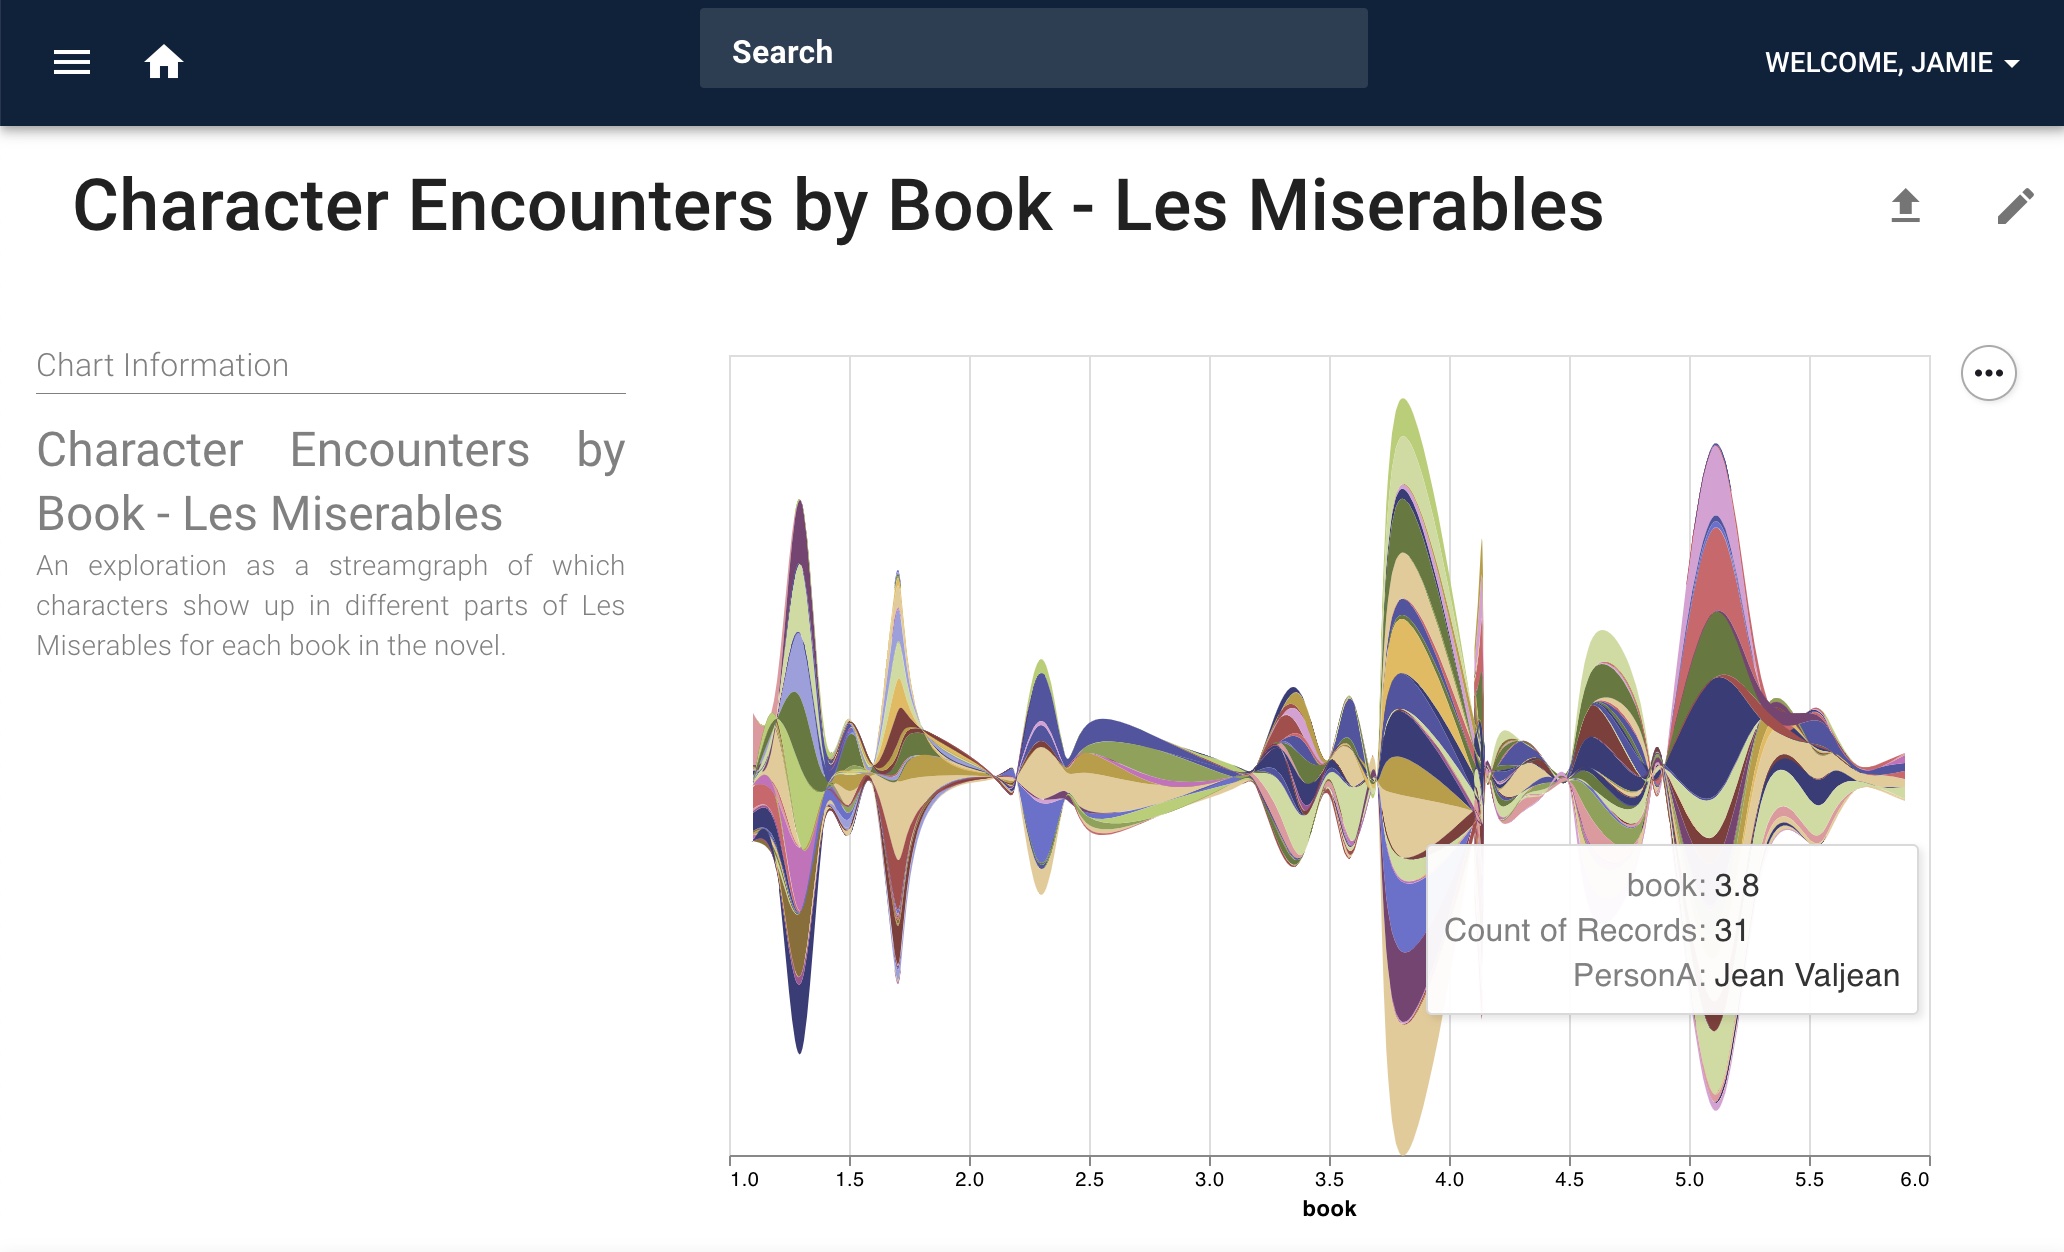
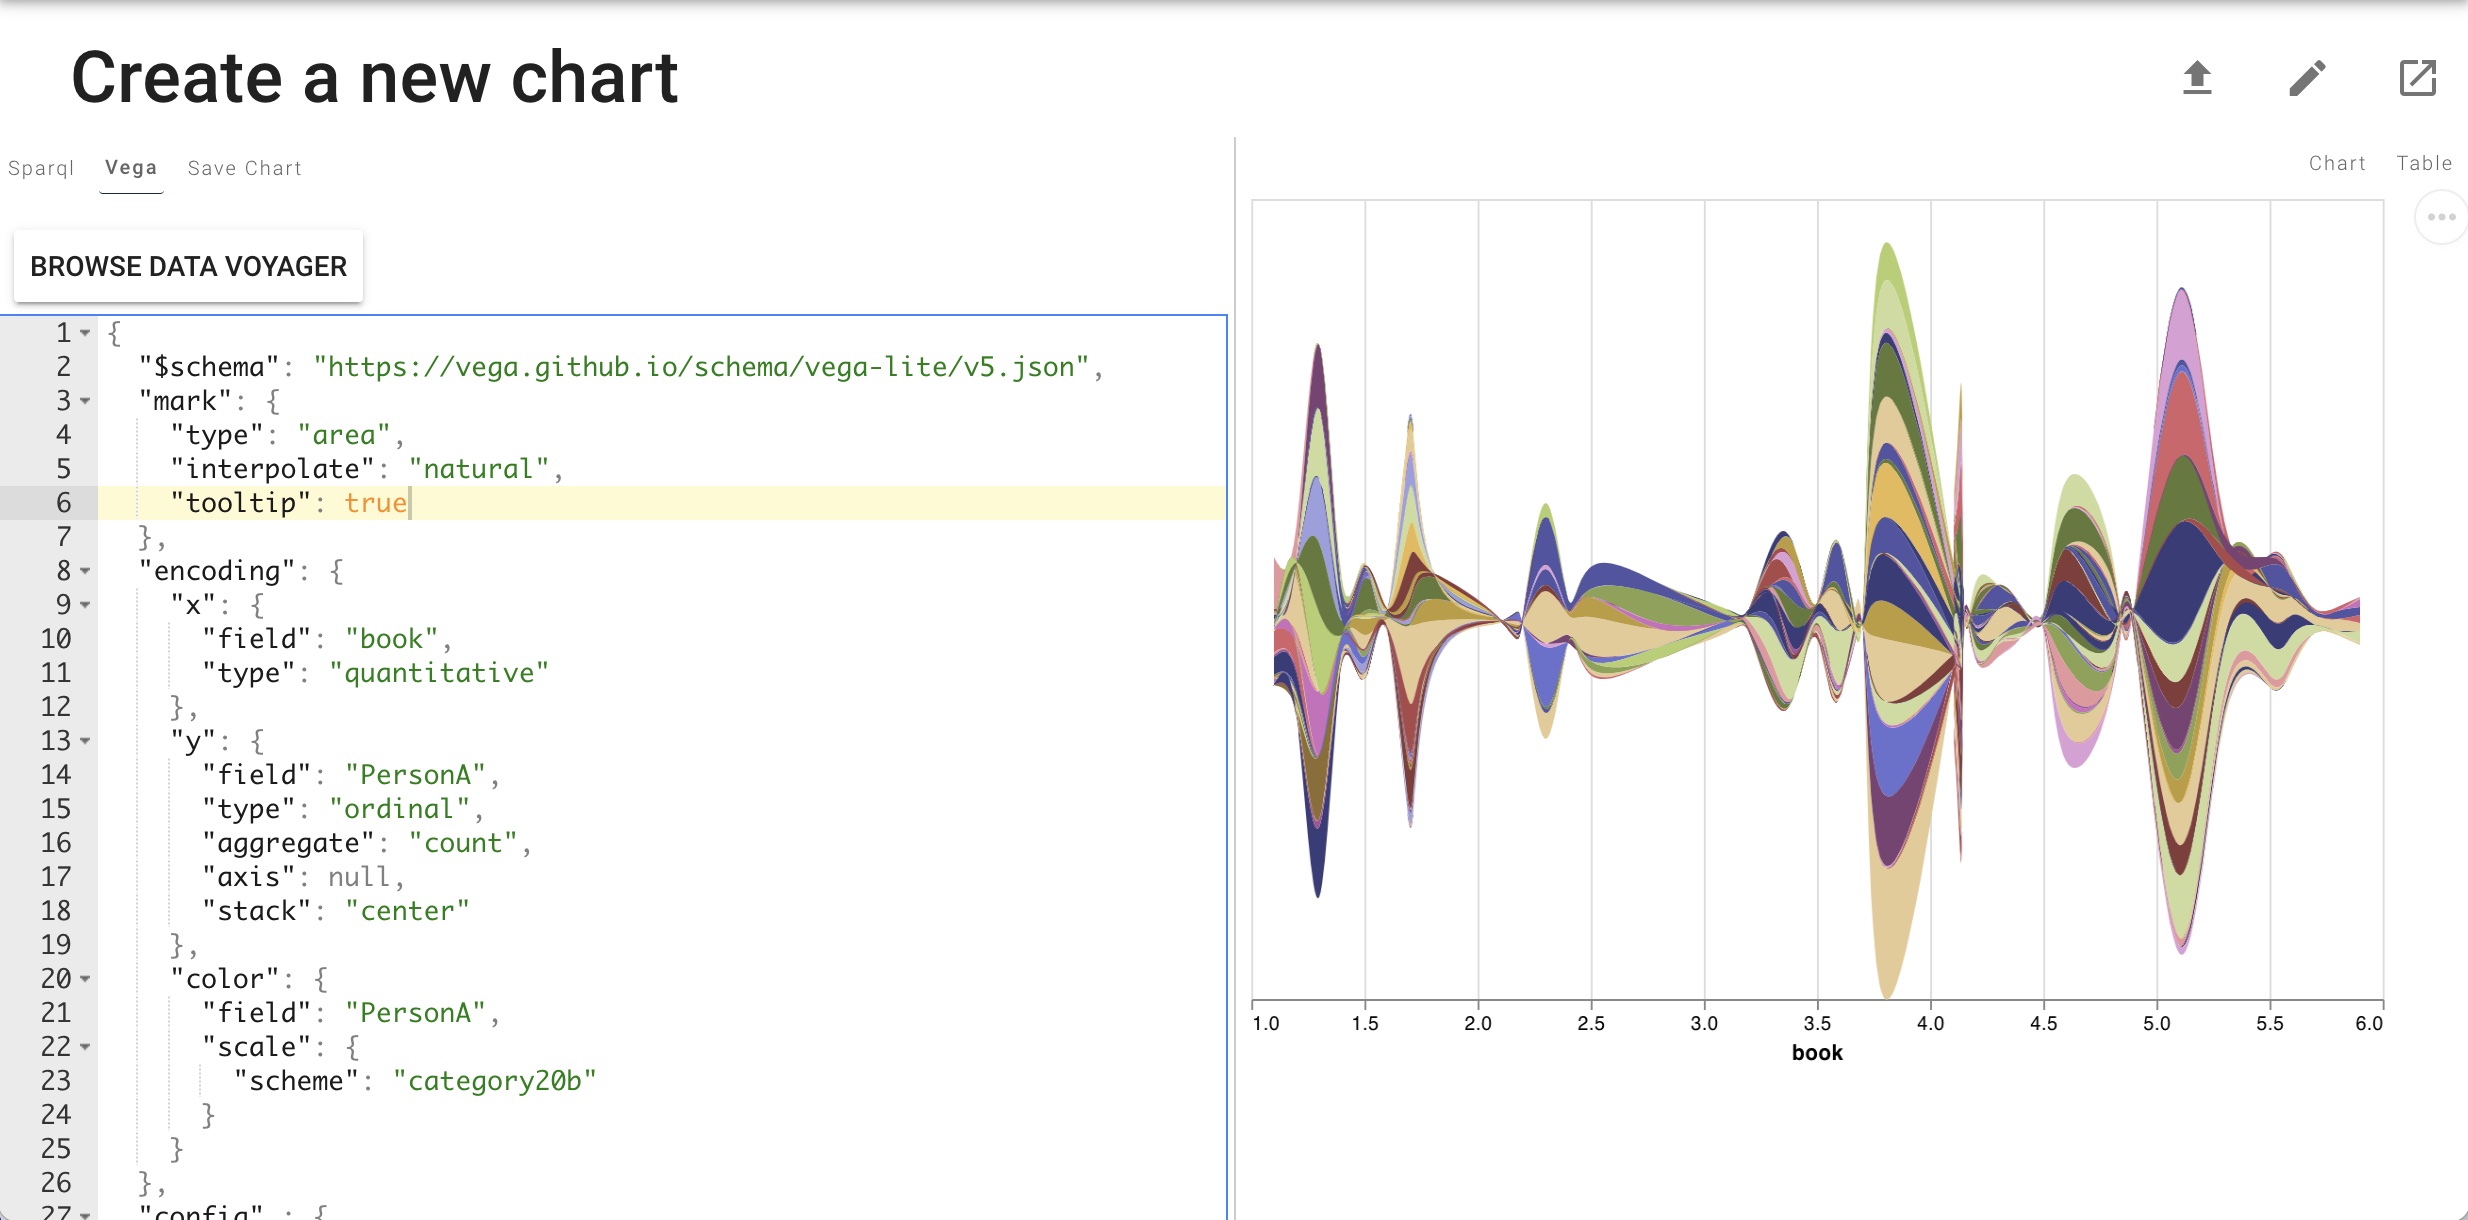
Visualize with SPARQL+VegaLite
We can also use SPARQL queries to create visualizations using the Vega Lite grammar of graphics. In the menu to the top left, click on “Create Visualization” and add the above query to the SPARQL editor. Then add the following Vega Lite spec to Vega tab above the SPARQL query:
{
  "$schema": "https://vega.github.io/schema/vega-lite/v5.json",
  "mark": {
    "type": "area",
    "interpolate": "natural",
    "tooltip": true
  },
  "encoding": {
    "x": {
      "field": "book",
      "type": "quantitative"
    },
    "y": {
      "field": "PersonA",
      "type": "ordinal",
      "aggregate": "count",
      "axis": null,
      "stack": "center"
    },
    "color": {
      "field": "PersonA",
      "scale": {
        "scheme": "category20b"
      }
    }
  },
  "config": {
    "legend": {
      "disable": true
    }
  },
  "width": 600,
  "height": 400
}
This will render the results of the SPARQL query using Vega Lite:
By clicking on “Save Chart”, you will be able to give the chart a title and description and save it as a persistent resource in the graph. It will be queryable like any other resource in the knowledge graph: